Many people arrive in Australia feeling prepared. They've researched flights, chosen a city, opened a bank account, and know someone who's already there. And yet, within the first three months, they discover things they hadn't considered — things that cost them time, money, or unnecessary energy.
ArrivoAU's diagnostic doesn't solve that problem. No tool does. But it does something useful: through a few simple questions, it tries to identify the points that most often catch people off guard — around finances, daily life, and what to do if things don't go as planned. The result isn't a prediction of what will happen. It's a set of alerts and reference points that can help you arrive with more clarity about where you're well prepared and where there's still room to adjust.
Why a diagnostic makes sense before you go
When we're excited about a big decision — and moving to another country is one of the biggest — it's very easy to analyse the situation through the lens of what we want to be true, rather than what actually is.
It's not dishonesty. It's human. The person who really wants to go tends to assume the job will come quickly, that costs will be lower than they are, that adapting will be easier than it will be. And sometimes they're right. But when they're wrong, the price is high — and it usually arrives at the worst moments.
The diagnostic exists to put some numbers on the table. Not to replace anyone's will or judgement — but to separate, at least in part, what you want to happen from what the data suggests will probably happen. With that separation, it becomes easier to identify where the planning is solid and where it depends on everything going right at the same time.
The three dimensions assessed
The diagnostic organises its questions into three areas. None of them are technical — they're questions anyone planning this move should be asking themselves. The value of thinking through each one isn't just to answer the diagnostic well: it's the exercise itself. Anyone who thinks about what can go wrong in each area arrives better prepared to deal with it when something does go wrong.
Preparation
This area measures how much you've informed yourself about what you'll find. It's not a test — it's a way to identify whether there are gaps that will cost you time and money in the first months.
The questions here don't require you to know the specific details of every city or regulation. They ask more broadly: have you done your research? Do you have a sense of what to expect? Do you understand the basics of your visa and what it allows?
Those who arrive without this foundation tend to make expensive decisions out of ignorance — they take the first rental available without comparing, don't know their rights at work, and are caught off guard by costs that were predictable. Thinking ahead about what you don't yet know — and what you'd do if you needed to find out quickly — already helps reduce that risk.
Financial
This is the area that most determines what the first months will look like. Not because money is everything, but because without adequate financial margin, any unexpected event becomes a crisis.
The questions here cover how much capital you have available, whether that money is truly accessible, what your housing situation will be on arrival, and what your English level is for the job market.
English factors in because it directly affects the quality of opportunities that will come your way. This doesn't mean someone arriving with basic English won't find work — they very likely will. But it may mean depending on less favourable offers, in worse conditions, with less control over the situation. And that affects not just income, but the entire experience of the first months.
Thinking about alternatives here is especially important: what would you do if the job takes twice as long as you expect? If your available capital isn't enough to cover the first months with margin, that's a question that needs an answer before you board.
Safety net
This area measures how much room you have to handle what wasn't in the plan. Not the ideal scenario — the alternative one.
The questions here cover whether you have a plan B if work takes longer than expected, whether you have people you can count on in an emergency, and whether you're clear on what you'd do if you needed to change course.
People who arrive with a single plan and depend on a single outcome — a specific job, a referral, a contract that isn't signed yet — are in a more fragile position than it seems, even if they have adequate capital and preparation. Thinking about what you'd do if plan A doesn't work out isn't pessimism — it's what separates those who can recover from those who get stuck when something changes.
How the calculation works
The diagnostic uses your answers to estimate three things: how much daily life will cost in the city you indicated, for the family size you described; how long it takes until you have a stable income; and how long your capital can cover the gap between the two.
It's a simple model — and it's important to be honest about that. It uses market averages and reference data, not your exact situation. In practice, some people arrive and have work on their first day. Others take weeks to find something and still earn well from the start. And some take months to have truly regular income — picking up odd jobs here and there, short contracts, stretches with nothing. This depends on factors no model can measure: a person's drive, the luck of being in the right place at the right time, connections that appear unexpectedly, industries that happen to be hiring at that moment.
What the model does is use your declared English level, your flexibility to accept different types of work, and your resilience profile as a starting point to estimate a probable scenario — not certain, not guaranteed, but plausible for most people with that profile.
What is runway
One of the central figures in the result is the runway — expressed in months. It answers the most practical question in the diagnostic: given the estimated cost in your city and the income the model projects for your profile, how long can your initial capital cover the gap?
The runway already accounts for expected income — it's not a simulation of how long your money lasts if you earn nothing at all. If the model estimates you'll generate A$600 per week and your weekly cost is A$700, the runway calculates how long your initial capital covers that A$100 weekly gap. If your projected income exceeds your costs, the runway shows as sustainable — with no upper limit.
The shorter the runway, the more urgent it is to find any source of income. A 5-month runway with a profile that takes 3 months to stabilise has margin — small, but it's there. A 2-month runway in the same scenario doesn't.
What the numbers show
Cities don't cost the same — and the difference is significant
The cost of living across Australian cities varies considerably, mainly due to rent. Sydney and Canberra are among the most expensive — rent for a single adult can exceed A$2,000 per month. Cities like Adelaide and Brisbane are considerably cheaper, with rents around A$1,600 to A$1,700 for the same profile.
To put it in practical terms: the difference between living in Sydney versus Adelaide can be A$700 to A$800 per month for a single adult. Over six months, that's more than A$4,000 less you'd need available to maintain the same financial buffer. For a family with children, the difference is even greater.
This doesn't mean you should necessarily choose the cheapest city. It means your city choice has a direct, concrete impact on how much capital you need before you arrive.
English affects more than your salary — it affects the conditions you'll work under
Arriving with fluent English opens more doors, with better conditions, in less time. Arriving with intermediate or basic English doesn't mean being left without work — but it can mean taking whatever comes first, rather than choosing. And taking whatever comes first, when you're at the limit of your capital, typically results in less favourable situations: difficult environments, hard hours, little stability, and sometimes employers who take advantage of those who don't know their own rights.
Basic English combined with little capital is precisely that most delicate combination: the urgency to generate income quickly can force you to accept conditions that make the experience far harder than it needed to be.
The diagnostic also considers your flexibility to accept any type of work — not just in your field — and how capable you feel of navigating this adaptation phase. Someone with intermediate English who accepts any job and has high resilience can have a much better outcome than someone with fluent English who only accepts specific roles.
Family composition changes everything
A single adult has a very different monthly cost from a couple with children. Beyond higher rent, there's food for more people, school for the kids, extra transport. A family with two adults and two children can have an estimated monthly cost of A$1,000 to A$1,500 more per month than a couple without children in the same city.
This means the capital that would be enough for a single person may not be enough for a family — and the diagnostic uses six different family configurations to reflect this reality, from single adult to large family.
What the result shows
The diagnostic doesn't just return a single number. The result is made up of several parts that, together, give a more complete picture of your situation:
Safety Score — a number from 0 to 100, with a corresponding colour, that summarises how balanced your current scenario is across the three areas assessed.
Runway — how many months your initial capital can sustain the estimated cost given the projected income. Already accounts for the expected time to find work — not a zero-income simulation.
Risk probability by time horizon — three percentages (6, 12, and 24 months) that estimate the chance of your capital running out in each period, given your declared profile. A high number signals that the scenario has little margin in that interval and that any delay in generating income increases real risk.
Dimension bars — an individual score for each of the three areas (preparation, financial, and safety net), so you can see where you're strongest and where there's most room to adjust.
Diagnostic text — a reading of your profile that includes a summary of the situation, the strongest point of your scenario, the point that deserves most attention, and concrete actions suggested based on your result. This text changes with your profile — it's not generic.
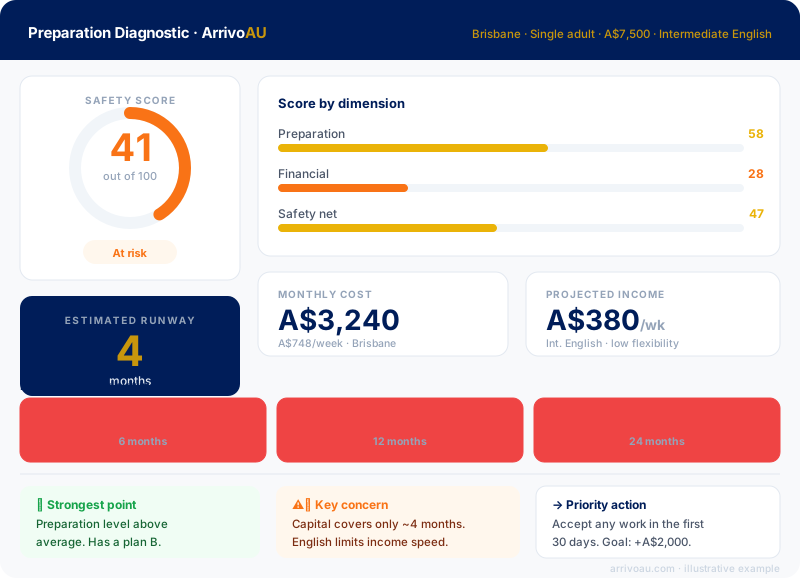
The five possible results
The diagnostic converts your answers into a number between 0 and 100 and classifies the result into one of five colours. Each colour indicates whether the three areas are adequate for the scenario you described, and tries to signal which ones deserve most attention.
Green — All three areas are well aligned for your scenario. Capital, the estimated time to income, and the support network sustain each other.
Blue — The overall picture is good, but one area has room for adjustment. One extra step in a specific area strengthens your arrival considerably.
Yellow — At least one area has a significant gap. The scenario still works, but with little margin for unexpected events. Worth identifying which area is weakest before you go.
Orange — More than one area raises concern, or one of them has a gap that puts the overall scenario at risk. Arriving in this condition leaves little room for error.
Red — The current combination of the three areas creates a high-risk scenario for the first months. Something concrete needs to change — more capital, more preparation, or a real alternative plan — before you leave.
What to do with the result
The diagnostic generates a number and a classification — but the real value lies in the questions it raises. Use this checklist to interpret your result:
1. How many months does my liquid capital sustain my estimated cost with no income at all? Add up expected rent, food, transport, and fixed expenses for the city and family composition you planned. Divide your available balance by that figure. If the answer is less than 3 months, any unexpected event puts you in a risk zone.
2. Is the estimated time to consistent work longer than my capital can sustain? If so, accepting something temporary to generate income in that interval isn't optional — it's part of the plan. Those who arrive expecting to wait for the ideal job without considering that phase can see their capital run out first. Adjusting expectations (taking work outside your field while looking for what you want) or increasing available capital are the two practical ways to resolve this imbalance.
3. Do I have a real plan B? Plan B is different from hope. It's a concrete answer to a concrete question: if plan A doesn't work, what do you do? Knowing what work you'd accept outside your field, having the contact of at least two people in the city who could help with referrals, and knowing which expenses you'd cut in the first 30 days if needed — that's a plan B. The rest is wishful thinking.
4. Are my working capital and emergency reserve two separate figures? They serve different purposes. Working capital is what you use day to day before income arrives — rent, food, transport. Emergency reserve is for real unexpected events: an illness, a contract penalty, a return flight. Merging both into a single number creates a false sense of security.
5. If the diagnostic returned orange or red, which specific area is pulling the result down? The result shows an individual score for each of the three areas. Focusing your adjustment on the weakest area is more efficient than trying to improve everything at once.
What the diagnostic doesn't do
It doesn't predict the future. It uses reference data that reflects typical Australian market conditions, but the market changes, personal circumstances vary, and unexpected events happen. A green result doesn't guarantee the experience will be easy. A red result doesn't mean you won't make it — it means the risk is high given your current profile.
It doesn't assess motivation, character, or the ability to adapt. Those things matter enormously in real life — but they don't enter a financial calculation.
It doesn't replace detailed planning. The diagnostic is a starting point, not a plan. Use the result as a map of the areas that deserve most attention — not as a verdict.
Why the diagnostic is useful even though it's simple
Most people who move to another country do this calculation in their heads, with rough numbers and optimistic assumptions. The problem isn't the optimism — it's the lack of structure to identify where that optimism is well-founded and where it's covering up a point that deserves attention.
The diagnostic forces concreteness: one city, one family size, one English level, one amount of available capital. When you answer with a real figure instead of "roughly," the diagnostic can say something more useful than "it depends."
That process — turning vague answers into concrete reference points — is the main value of the diagnostic. Not because the numbers are perfect, but because they make the problem visible.
Conclusion
The difference between those who arrive prepared and those who arrive at the limit is rarely about effort or determination. It's usually about planning ahead — and being honest about the points that still need attention.
ArrivoAU's diagnostic doesn't exist to discourage you from going. It exists so that when you do go, you know exactly what ground you're standing on — where the numbers add up, where there's margin, and where the real risk lies.
If your result is green or blue: confirm the logistical details, keep your capital accessible, and arrive with finding your first job as the priority.
If it's yellow: identify the main gap and resolve it before you leave. Usually, one adjustment in one area is enough to change the result.
If it's orange or red: use the result as an honest diagnostic, not a disappointment. You still have time — and preparation is exactly the advantage that separates a solid arrival from one in crisis.
Comments
Have something to add or a question? Leave a comment below — your experience can help other immigrants in Australia.
Comments are public. You can delete yours from the same browser and device you used to post.
Loading comments…